-
Choosing the right location
A patio is often an extension of your house. So when you’re deciding on the location, keep in mind the direction of your house and the prevailing wind, the positions of the sun and the times at which the patio will be in sunlight. Decide on the size of the patio, if necessary together with a plan of the garden layout.
-
Preparations when using composite planks
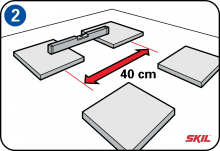
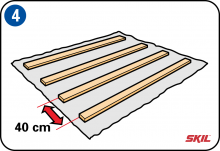
Remove a layer of earth and even out the ground. It’s very important to do this carefully. The distance between the supporting beams and the paving stones on which they will rest should be a maximum of 40 cm (center-to-center). Tap the paving stones into place and check that they are horizontal.
-
Make sure the ground is flat
The supporting beams must rest on a hard surface. You can make this using paving stones, a concrete base or a bed of gravel. Always make sure the underlying ground is stable and flat.
If it’s made of earth or sand, cover the stones with an anti-rooting mat. -
Leave a gap from the wall
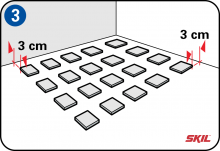
Place the supporting beams on the ground with the ends in line. Keep a gap of 3 cm from the wall to allow for expansion due to sunshine or rain. It may be necessary to place an extra supporting beam under the joints between the ends of 2 planks to ensure stability.
-
Using clips
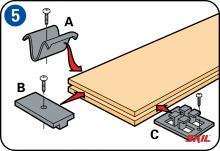
Start by laying the first plank, and attach it with an end clip to the supporting beam. Note: don’t screw directly into the supporting beam, but avoid splitting by first pre-drilling the holes. Fit a clip into the opening at the other end of the plank, and after pre-drilling the holes screw the clip into place. Use stainless steel screws to prevent rusting. There are different kinds of clips, see A, B and C, but the fixing method is the same – push them into the opening and screw them into place on the supporting beams.
-
Fit the next plank
Push the next plank up against the clip, which also acts as a spacer between the planks. Remember to allow the same spacing of 1 cm in the next row of planks.
-
Informal bond
Once you have fixed the planks in place, you can if desired finish the visible ends of the planks with the end caps. It’s better to fit the planks in an informal bond, instead of with the joints all in the same line, as this ensures greater stability.
-
Step tip
If you have to saw planks to length, make sure you can saw the required thickness and you use the right kind of saw blade for the material. For more information about the right kind of electric saw to use for each job, please see tool usage. -
Patio on sleepers
You can also make a patio out of hardwood and sleepers. Good choices of wood are FSC certified Bankirai hardwood or impregnated Central European pine
Laying sleepers in sand
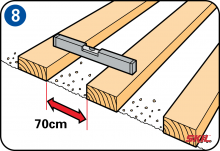
Use planks with a cross-section of 2.5 x 14.5 cm. These are available in different lengths, and can be laid directly on the ground. The spacing between the sleepers should be not more than 70 cm. Make sure the sleepers are level using a spirit level with a supporting plank if necessary. Use an anti-rooting mat, or otherwise scatter gravel between the sleepers to help prevent weed growth. -
Screwing the planks in place
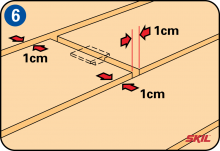
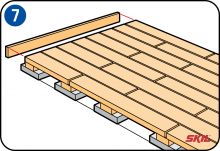
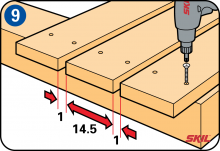
Screw the planks to the sleepers with stainless steel screws. First pre-drill the holes to allow the screws to be tightened fully and prevent splitting. The planks must be able to expand and contract freely, so leave gaps of at least 1 cm between adjacent planks. The same applies at the ends of the planks. Screw a plank vertically to the ends of the patio planks for an attractive finish.
-
Step tip
You may have to saw planks to length so the ends are at the centers of the sleepers. Alternatively you can lay a remaining piece of sleeper under the place where the 2 ends meet.

