-
Insulation materials
The choice of the insulation material and its thickness is an important factor. The thicker the material, the better the insulation. However, double the thickness of insulation doesn’t mean it will be twice as effective. The insulation needs to be applied in an airtight layer to prevent internal condensation. The insulation material is usually supplied with an airtight and damp-proof layer. Always use the greatest possible roll width to keep the number of joints to a minimum.
We will cover four types of roof insulation:
• glass wool insulation panels with a damp-proof membrane
• insulation blankets
• mineral wool
• polystyrene insulation panels
After that we’ll explain how you can finish the inside of the loft roof and how you can also insulate the floor. -
Glass wool insulation panels
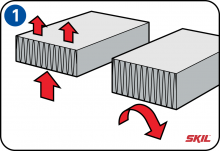
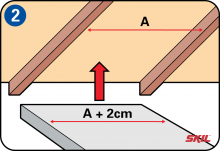
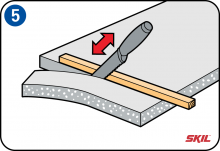
First measure the width between the roof beams. Then cut the insulation material, allowing 1 or 2 cm extra width. That will make sure the insulation material stays firmly in place between the roof beams. Wear a dust mask and gloves when you’re handling or cutting the insulation material. Cutting is easier if you compress the material with the wooden or aluminium profile straight-edge.
-
Damp-proof membrane
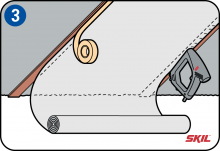
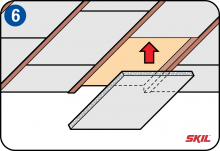
Make sure there are no gaps in the joints between the insulation panels through which drafts can pass. When you’ve completely insulated the roof apply the damp-proof membrane, working from top to bottom. Staple the membrane tightly into place on the roof beams with an overlap of 10 cm and cover the overlaps with strips of insulating tape.
-
Insulation blankets
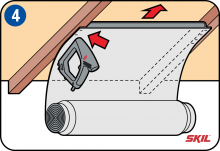
Start working in a corner. Roll the material out between the roof beams, working from top to bottom. Make sure the damp-proof membrane is tensioned tightly. Fix the overlapping flanges at the edges with a staple gun at 10 cm intervals. Before stapling the lower part into place, cut off the excess material. Wear a dust mask and gloves when you’re handling or cutting the insulation material. Then press the blankets firmly into place and staple them to the beams. Cover the joints between the edge flanges with adhesive tape to ensure there are no gaps. You can also use adhesive tape to repair any tears in the material.
-
Mineral wool
Mineral wool in rolls or sheets is the most widely used material for loft insulation. The width of the insulation should be slightly greater than the distance between the roof beams. That will make sure the insulation material stays firmly in place between the roof beams. Mineral wool is easy to cut with a bread knife. Always wear a dust mask and gloves when you’re handling or cutting the insulation material. For a neat result, it’s easiest to cut along a wooden or aluminium profile straight-edge.
-
Polystyrene insulation panels
If the roof beams are straight and flat, you can also use insulation panels made of polyurethane, polystyrene or mineral wool. In that case it’s best to use panels with a board backing to reduce the risk of fire and deformation of the panels.
Fit the panels in a bond pattern so the joints are not continuous. This improves airtightness and gives a more even surface. To cut the panels to size use a fine-toothed hand saw or a jigsaw. Fitting the panels is best done by two people, because the panels are quite large and can easily break. Use a power drill/screwdriver to fit the fixing screws with large washers at 25 cm intervals. -
Further finishing
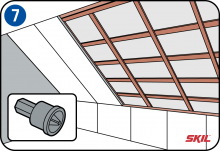
After you’ve insulated the roof, you can finish the inside with plasterboard or other sheet material. If you’re using plasterboard you’ll need to first fix wood battens across the roof beams to make a sturdy framework onto which you can easily fit the plasterboard panels. You can then fix the plasterboard panels to the wood battens using self-tapping screws. It’s best to use a power drill/screwdriver with a plasterboard bit adapter, so you don’t damage the plasterboard.
-
Insulating the loft floor
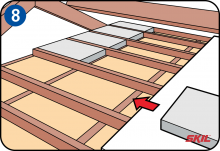
If your loft doesn’t have an open staircase, you can choose to just insulate the floor. The insulation works best on a flat surface, and should be laid with the individual panels joined tightly together. To seal the floor structure as well as possible, you can first apply an airtight membrane. If your loft only has a lightweight floor structure you need to apply a moisture-proof membrane, especially if there’s a poorly ventilated bathroom directly underneath.
Cut the insulation panels or sheets slightly wider than the gap between the beams and press them firmly into place. If you’re using insulation blankets, use a width that allows you to staple the insulation to the sides of the beams. Try to keep the material as tight as possible, without gaps or folds. The insulation between the beams doesn’t need to be covered. If the loft needs to be accessible, you can fit lateral beams with sturdy panels on top of them.

