-
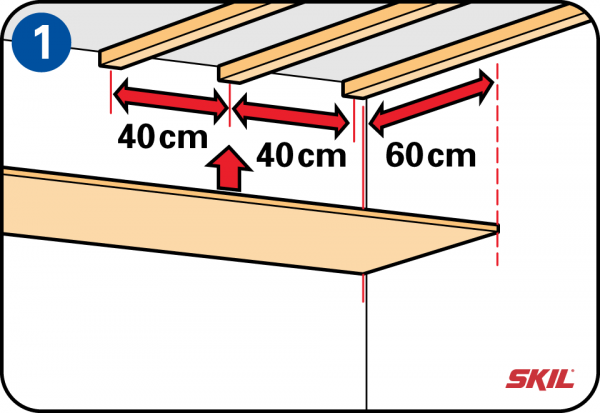
Option 1: Fixing the framework DIRECTLY to the beams or plastered ceiling
Start by fixing a wooden framework to act as supporting structure directly to the existing ceiling or roofing beams. Make sure you use the right plugs. Note that the roofing beams may be of different heights. Fix the wooden supports with a spacing of 40 cm. The ceiling panels are then screwed to the wooden framework.
-
Step tip
Using a mitre saw makes it easier to cut the framework beams to length! -
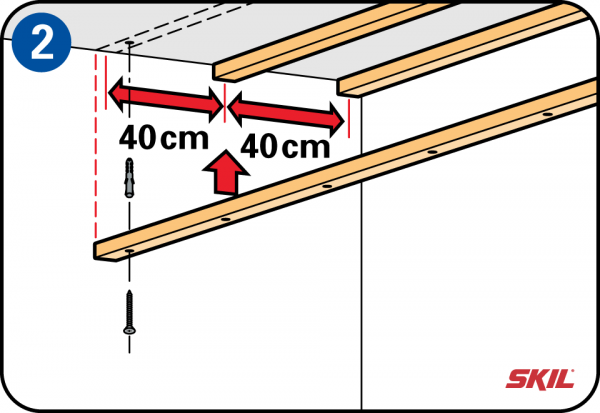
Option 2: Fixing a SUSPENDED framework to a plastered ceiling
As in step 1, fix the supports to the ceiling with equal spacings of 40 cm. Screw the supports to the existing ceiling using screws and plugs. Make sure you fit all the supports at the same height.
-
Fixing vertical struts to the supports
The next step is to decide on the height of the new ceiling. Measure the desired height from the floor and mark it off at the 4 corners. You can then use struts of the right length to fix the false ceiling panels. Fix the struts to the supports on the ceiling. The insulation panels are usually 60 cm wide. So if you also fix the struts with a 60 cm spacing, the insulation panels will fit exactly between them. That means you won’t need to cut the panels to size.
-
Fixing the wall supports and framework members
Use a cord and a spirit level to mark off the positions of the wall supports on the wall. A laser level is a good solution if you have one. The underside of the framework will then be horizontal. Fix the wall supports to the wall along the marked lines with plugs and screws, and then fix the framework members all at the same height to the bottoms of the struts.
-
Apply the insulation
The insulation panels are then fitted over the framework members. If you have fitted the struts with spacings of 60 cm you will be able to fix the insulation panels without the need to cut them to size. Don’t forget to apply insulation between the vertical struts to create an uninterrupted insulation layer. Always wear gloves, safety glasses, a dust mask and protective clothing when working with insulating materials.
-
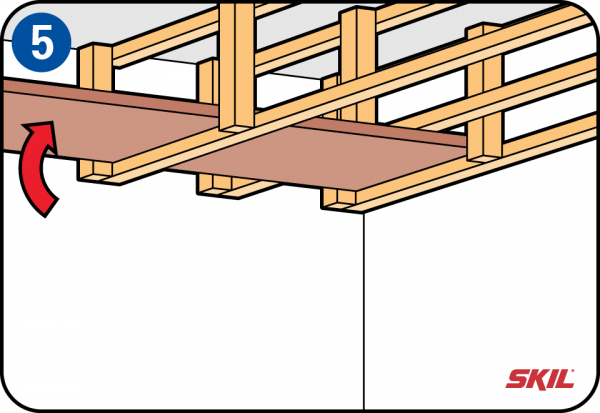
Fix the first row of ceiling panels
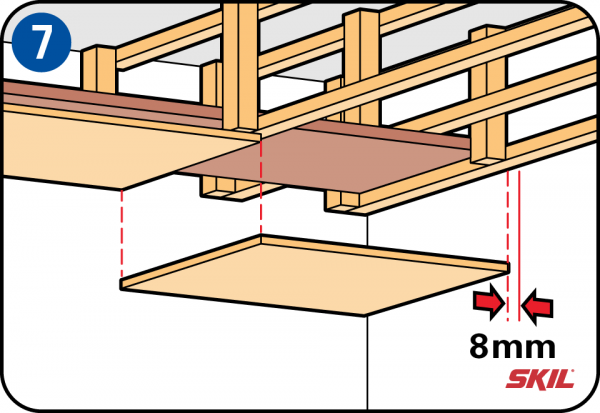
Screw the first ceiling panel to the left side against the wall, using 25 mm plasterboard screws with a spacing between screws of 20 cm. Allow an 8 mm expansion gap between the panel and the wall. This gap is later covered with a finishing strip. Fit the next ceiling panel with the short side against the short side of the first panel, followed by the long side.
-
Cutting panels to length
At the end of the row, measure the required length and mark this off on a new panel. Use the remaining part of the panel to start the next row. If you start each row with a panel of the same length you will have a regular appearance of the finished ceiling. To cut a panel to length, score it on the visible surface with a hobby knife and then break it off using a wooden strip or plank for support. You can then cut through the cardboard backing.
-
Finishing the joints
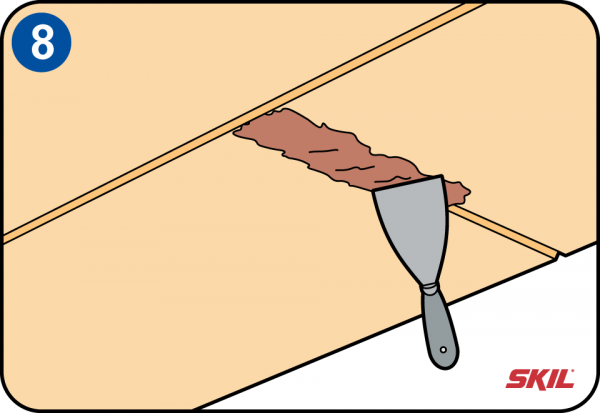
If you want to finish the joints between the ceiling panels, make sure they are clean and dust free. Then fill the gaps with grouting paste and a putty knife. After drying for 24 hours, apply a second layer if necessary and sand smooth after drying. To prevent later cracking of the joints, you can use flexible mesh fixed in place with the grouting paste
-
Edging profile
To finish the outer edges of the false ceiling neatly, fix the finishing strips in place with construction adhesive. Put a few spots of adhesive on the finishing strip, press it into place, remove it again immediately, and after waiting for 5 minutes tap it firmly into place. For a neat finish in the corners you can cut the ends of the finishing strips at 45°.
-
Step tip
If you intend to install recessed spotlights in the ceiling, you need to run the cables when you are fitting the supporting framework. Cut out the holes for the spotlights with a large hole saw. Run the cables to all the spotlight positions, and connect the wiring in accordance with local electrical regulations.