-
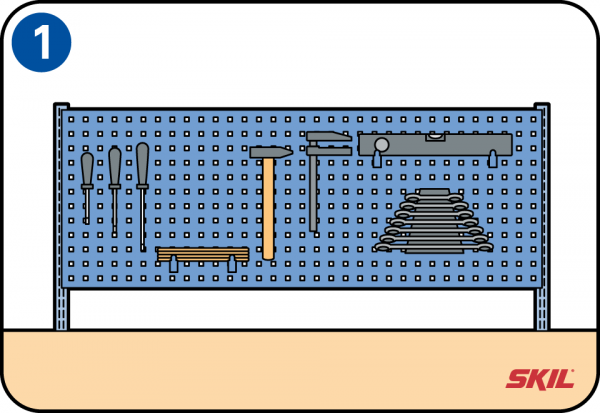
A tool board
You must be able to find tools quickly when you need them. If you hang them on the wall they will be clearly visible and easy to reach. Different systems to hang up your tools are available in DIY stores.
Tip: hang heavier tools like hammers at the bottom. Then they won’t cause so much damage if they fall. Always hang dangerous tools like knives and electric planers out of the reach of children. -
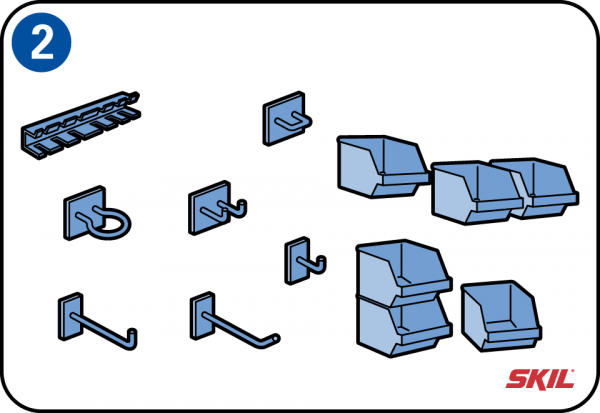
Peg boards
Most tool boards are ‘peg boards’ with holes or slots into which you can fit different kinds of hooks, eyes, holders and storage tubs.
These systems are available in different sizes, and you can choose your own layout. -
Find the right place
Choose where you want to hang your tool board. If there’s enough space, you can fit a wooden plank over the board with a fluorescent lamp. That means you’ll always have plenty of light where you’re working. Use a strip of wood to shield the front of the lamp so you won’t be blinded by the light. You can use the top of the plank for storage tubs or power tools. And you can also fit storage cupboards over the top of the plank. Make sure you can still reach them!
-
Which tools do you need for which tasks?
You’ll need a few essential tools for everyday jobs and repairs. So make sure you have these basic items in your toolbox or on your tool board. The list below is a handy guide if you’re following job instructions where specific tools are mentioned.
-
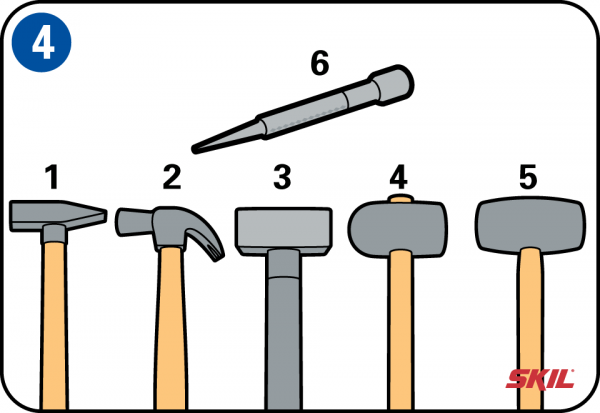
Hammers
1. You can recognize a carpenter’s hammer by the tapered tip. This allows small nails to be driven into the wood
2. Claw hammer; the curved claw is used for extracting nails
3. A mallet has a heavy head which produces a much greater impact than a standard hammer
4. A rubber hammer is used to avoid damage to the material or workpiece
5. A wooden hammer is used to drive wedges or to strike a chisel
6. A punch allows you to tap out the central pins of hinges and to drive the heads of nails below the surface of the wood -
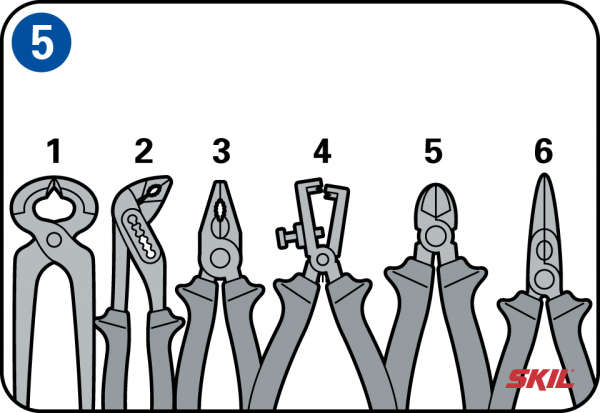
Pliers
1. Pincers are used to pull out nails or to cut through wire
2. Water pump pliers are used to get a firm grip of water and waste pipes. The adjustable jaws allow a wide range of pipe sizes to be gripped
3. Combination pliers – as the name says – are a combination of flat-jaw pliers, pincers and water pump pliers. The sharp cutting edges can be used to cut thin wire
4. Wire stripping pliers let you remove the insulation from electrical wires and cables. The pliers have an adjustment screw for wires of different diameters. After cutting through the insulation, it can be pulled off the wire
5. Side cutters are widely used for cutting through (electrical) wires and cables
6. Long nose pliers have thin, pointed jaws, making them ideal for all kinds of precision assembly tasks. The toothed jaws ensure a firm grip with minimum need for force by the user -
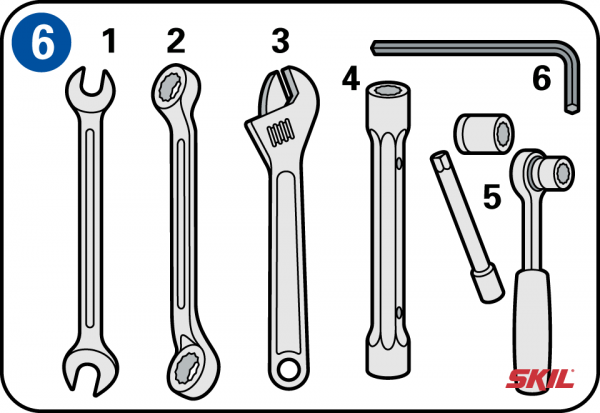
Wrenches and sockets
1. A wrench is used to tighten and release nuts and bolts
2. A box-end wrench is similar to a standard wrench but grips all 6 faces of a nut or bolt, while a standard wrench only grips 2 faces
3. An adjustable wrench fits a wide range of nut and bolt sizes if you don’t have the right size wrench
4. A spark plug wrench is used to tighten and release hard-to-reach components
5. A socket wrench has 6 or 12 gripping points, with a square opening in the top face for a socket handle or ratchet handle
6. A hex key or Allen key has a right-angled handle with a hexagonal head at one or both ends, and is used to tighten and release hex-head bolts -
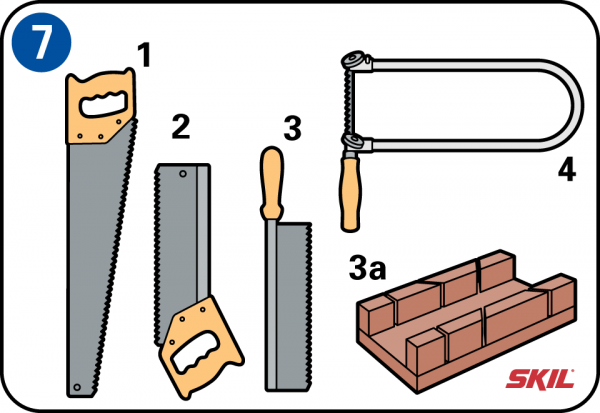
Wood saws
1. A wood saw is used to cut all kinds of wood and panels. These saws usually have a universal tooth profile
2. A backsaw has a reinforced top edge. This gives it extra stiffness for making straight cuts
3. A gent’s saw is a small backsaw with slightly offset teeth for making quick cuts, for example in wooden frames or wood strips. This saw is usually used in combination with a miter box (3a)
4. A fret saw has a fine-toothed blade which is tightened by wing nuts in a U-shaped frame. When using this kind of saw you have to keep the frame vertical. The teeth then point downwards, and you cut through the wood or panel by pulling the frame backwards -
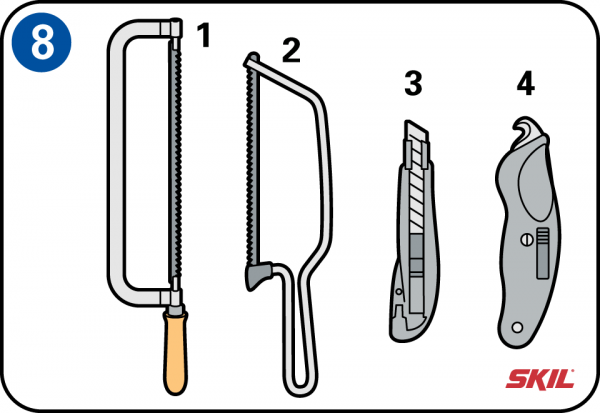
Hacksaws and cutting tools
1. In a hacksaw the removable blade is fixed tightly in a frame. The teeth of a hacksaw blade point forwards
2. A junior hacksaw is handy for working in tight or hard-to-reach spaces
3. A utility knife or hobby knife has snap-off disposable blade segments, and can be used to cut materials like leather, vinyl, paper, cardboard and plastics
4. A hobby knife with a curved, pointed blade is used for cutting linoleum. It works by pulling the blade towards you -
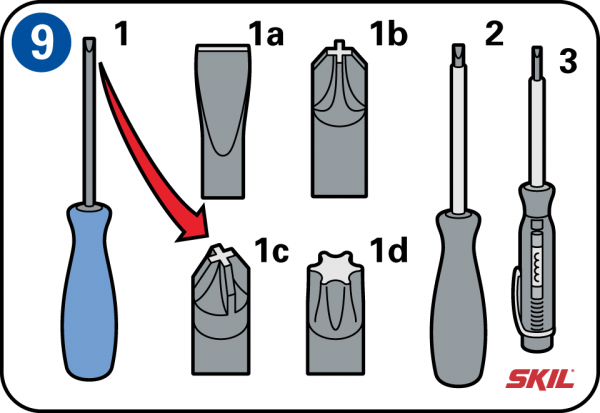
Screwdrivers
1. When using a screwdriver you should always choose one with a tip of the right type and size. That’s why your toolkit should always include a number of different screwdrivers. The most commonly used screwdriver types are: Slotted head (1a), Crosshead (Posidrive) PZ (1b), Crosshead (Phillips) PH (1c) and Torx TX (1d)
2. An electrician’s or VDE screwdriver has a shaft which is covered with plastic insulation, and is available in numerous different sizes. The tip fits the small screws used in electrical fittings and screw terminals
3. A mains tester is used to check for the presence of mains voltage (220-240 volt) by touching the tip of the screwdriver against the terminal or other conductor and holding your finger against the metal contact at the back of the handle. If the lamp in the screwdriver lights it means the terminal or component is connected to the mains voltage; before starting work remove the power plug from the mains outlet or switch off the relevant group in the meter cabinet -
Drilling tools
1. You can use a standard hand drill or gimlet for predrilling screw holes in wood or other soft materials
2. An awl is used for making small holes in softer kinds of wood, as well as for marking out holes and lines or pricking holes in materials
3. You can use a cordless drill for drilling and for tightening and removing screws, as well as for sanding, polishing and grinding -
Filing and planing tools
1. Wood chisels are available with tips of different sizes, from wide to narrow, and are used for woodworking. When more force is needed you can use a rubber or wooden hammer
2. Files are available in flat, half-round, square and triangular types. They are used for smoothing metal, plastic and wood, and for removing rough edges and other irregularities
3. A wooden block plane is used to remove wood in thin layers. You can adjust the planing depth by loosening the wedge that secures the blade and moving the blade slightly
4. A cold chisel is used for removing parts of masonry or for making recesses for mains sockets, pipes and conduits -
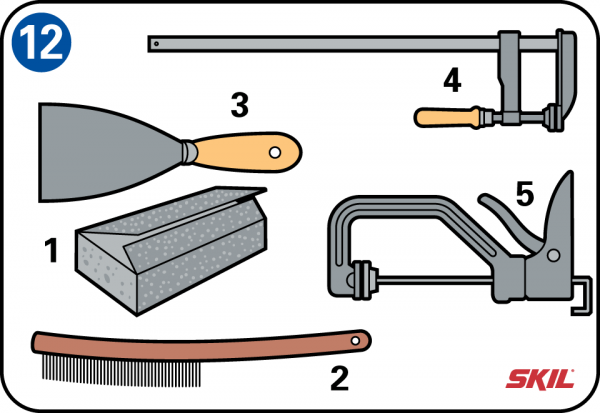
Auxiliary tools
1. If you fold sandpaper around a sanding block, it’s easier to sand surfaces smooth and flat. Always sand in the direction of the wood grain
2. A wire brush is handy for removing dirt and rust. The brush is usually made of steel, but you can use a brass or copper brush on soft surfaces
3. A filling knife is used to fill holes and cracks in walls, wood or metal. You can also use it to scrape off old paint layers and wallpaper residues
4. Clamps are used to hold workpieces together, for example when you want to glue them. It’s a good idea to protect your workpiece with card, blocks of wood or triplex
5. As the name suggests, quick-grip clamps are faster to use than the usual kinds of clamps but still allow tight workpiece clamping -
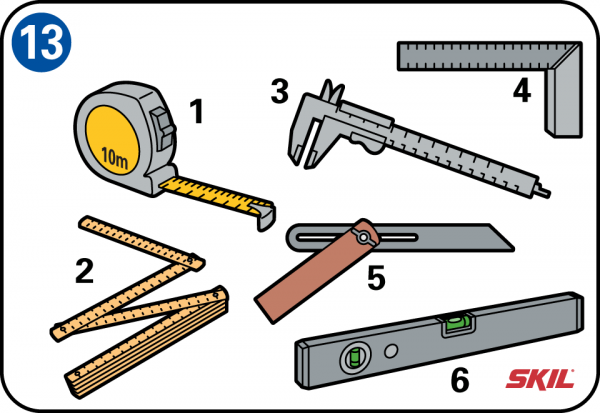
Measuring tools
1. The well known tape measure easily fits in your pocket
2. It’s often handier to use a yardstick, because unlike a tape measure the end doesn’t bend when you’re measuring from a distance. It also allows more precise measurement
3. A caliper is a measuring tool for making precise internal, external and depth measurements. It has 2 pairs of jaws for internal and external measurements as well as a depth probe. Standard calipers have a ruler scale on the tool body for direct measurement, but types with a digital display are also available
4. A try square lets you check that one part of a workpiece is at right angles to another
5. A sliding T bevel is used to transfer an angle from one workpiece to another. The angle between the blade and handle can be set by means of a wing nut, so that the same angle can be copied and checked after sawing
6. Of course every toolkit should include a spirit level. When the bubble is exactly centered between the 2 markings, you know that your workpiece is perfectly horizontal or vertical -
Personal protection equipment and safety
Always use the right personal protection equipment to protect you from noise, dust or sparks while you are working. For example:
1. Working gloves
2. Dust mask
3. Ear defenders
4. Safety glasses
It’s also a good idea to make sure you have a first aid box and a fire extinguisher / fire blanket / bucket of water close to where you’re working. -
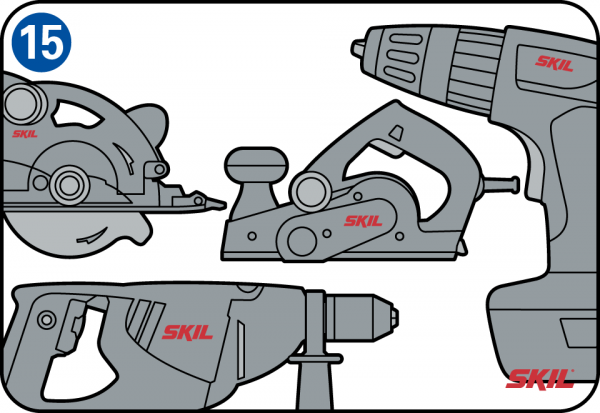
Electrical tools
It goes without saying that electric versions of most of the tools described here are also available. These are usually too big to keep them on your tool board.
• Electric staple gun
• Hammer drills
• Laser / measuring tools
• Angle grinders
• Hammer drills
• Hot air guns
• Jigsaws
• Electric planers
• Routers
• Sanders
• Circular saws
• Reciprocating saws
• Drills